A dripping faucet may seem like a small problem, but those drops can add up over time. You might hear the constant sound of water hitting the sink, notice a wet spot around the faucet, or see water dripping even when the handle is turned off. Besides being annoying, a leaking faucet can waste water and increase your water bill.
The good news is that many faucet leaks are caused by worn washers, damaged seals, or old cartridges. These parts can often be replaced without changing the entire faucet. With a few basic tools and some patience, many homeowners can handle a simple repair themselves.
However, the correct fix depends on where the water is leaking and what type of faucet you have. In this guide, you will learn how to identify common faucet types, repair different kinds of leaks, and recognize when it is better to call a plumber.
Tools and Materials You’ll Need
Before starting the repair, collect the tools and replacement parts you may need. Having everything ready makes the job easier and reduces the chance of leaving the faucet apart while searching for a tool.
Basic Tools
- Adjustable wrench
- Screwdrivers, including flathead and Phillips types
- Pliers
- Allen key set for faucets with small handle screws
- Soft cloth or towel
- Small bowl for screws and other parts
- Flashlight for inspecting tight spaces
Replacement Parts and Supplies
- Replacement washers or O-rings
- A compatible faucet cartridge, if required
- Replacement valve seals or springs for certain ball-type faucets
- Plumber’s grease approved for potable-water plumbing
- White vinegar for removing mineral deposits from compatible parts
You may not need every item on this list. The replacement parts depend on the faucet model and the source of the leak.
Take a photo of the faucet and note its brand and model before buying parts. If the model is unknown, take the old cartridge or washer to a plumbing supply store to help find a suitable replacement.
Important: Turn off the water supply before taking the faucet apart. Keep a towel in the sink to protect the surface and prevent small parts from falling into the drain.
If your water pressure is also low, check out our guide on how to fix low water pressure.
Identify Your Faucet Type
Identifying your faucet type is an important first step because different designs use different internal parts. Replacing a washer in one faucet will not solve a problem caused by a damaged cartridge in another.
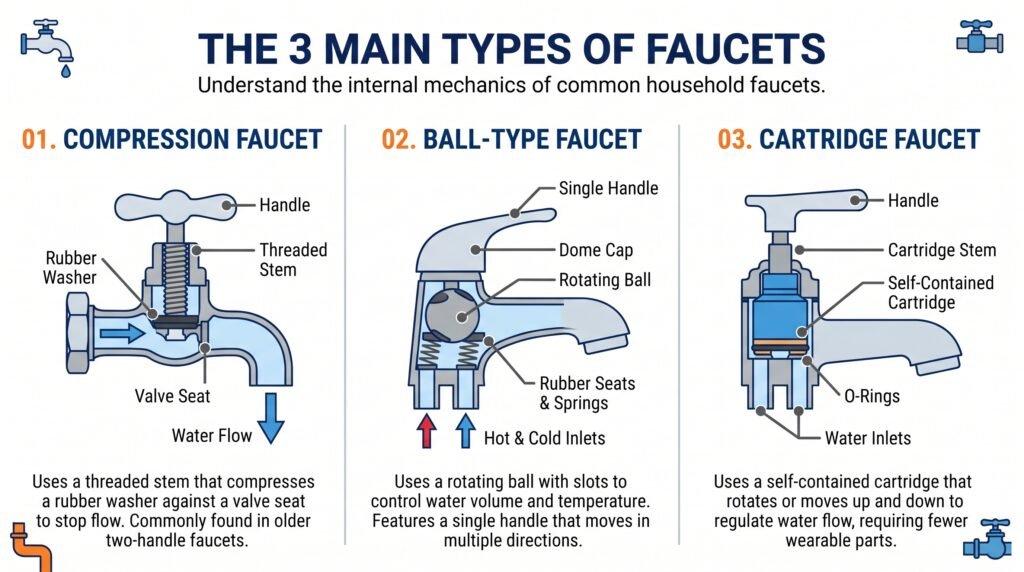
Most household faucets fall into a few common categories.
Compression Faucets
Compression faucets usually have two separate handles, one for hot water and one for cold water. You turn the handle several times to open or close the valve.
These faucets commonly use rubber washers to control the water flow. Over time, the washers can become hard, cracked, or worn. A damaged washer or valve seat may allow water to drip from the spout after the handle is closed.
Common sign: The faucet continues dripping even when the handle is fully turned off.
Ball-Type Faucets
Ball-type faucets usually have one handle that moves up and down and from side to side. Inside the faucet, a rotating ball helps control the water flow and temperature.
These faucets may contain rubber seals, springs, and other small parts that wear out with use. A damaged seal can cause dripping from the spout or leaking around the handle.
Common sign: Water leaks from the spout or handle area, or the handle becomes difficult to move.
Cartridge Faucets
Cartridge faucets can have one or two handles. They use a cartridge inside the faucet body to control water flow and, in many models, temperature.
A worn cartridge or damaged seal may cause water to drip from the spout or leak around the handle.
Common sign: The faucet keeps dripping after being shut off, or the handle becomes stiff or difficult to control.
Not every faucet follows exactly the same design. If you are unsure which type you have, check the manufacturer’s instructions before removing any parts.
How to Fix a Leaky Faucet Handle (General Steps)
Water leaking around the handle is different from water dripping out of the spout. A handle leak may come from a worn O-ring, a damaged seal, or a loose or deteriorated internal component.
Use the following steps to investigate a handle leak.
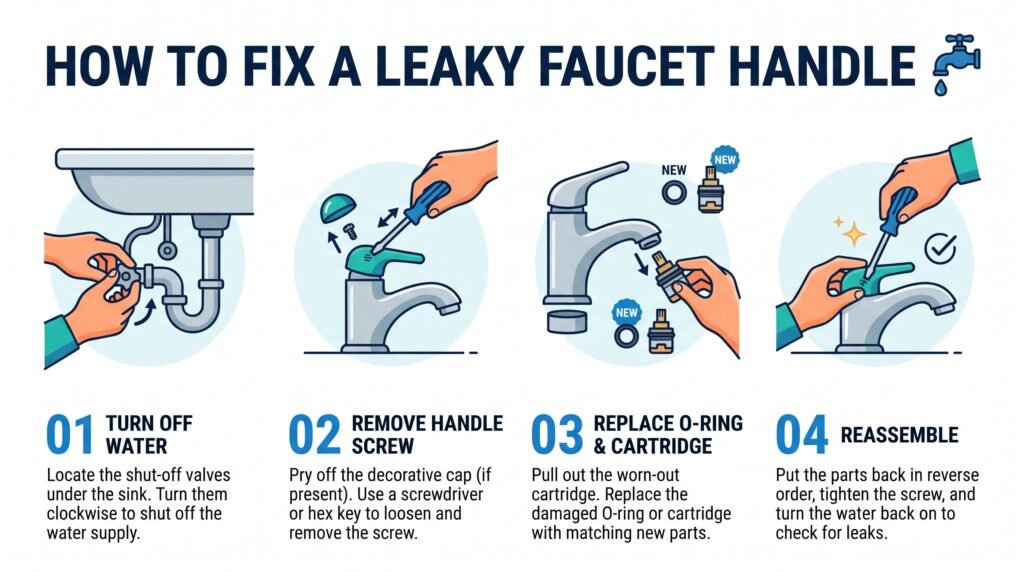
Step 1: Turn Off the Water Supply
Look underneath the sink for the hot and cold water shut-off valves. Turn the appropriate valves clockwise if they are designed to close that way.
If there are no separate valves, or they do not work properly, you may need to shut off the main water supply.
Open the faucet briefly to release remaining pressure. If water continues flowing, stop and make sure the supply is fully shut off before proceeding.
Step 2: Remove the Faucet Handle
Look for a small screw beneath a decorative cap, behind the handle, or along its side. Carefully remove the cap if present, then loosen the screw with the correct tool.
Lift the handle gently. Do not force it if it is stuck, as this can damage the handle or faucet body.
Step 3: Inspect the Internal Seals
Depending on the faucet type, you may find an O-ring, cartridge, packing seal, or another component beneath the handle.
Look for cracks, flattened rubber, mineral deposits, or signs of damage. Take a photo before removing anything so you can remember how the parts fit together.
Step 4: Replace the Damaged Part
Use a replacement part that matches the faucet model. If the O-ring is worn, replace it with the correct size and type. If the faucet uses a cartridge, follow the manufacturer’s instructions for removing and installing it.
Apply only a small amount of suitable plumber’s grease where the manufacturer recommends it. Do not use ordinary petroleum jelly on rubber seals unless the manufacturer specifically approves it.
Step 5: Reassemble and Test
Put the parts back in the correct order and tighten the handle screw securely without overtightening it.
Slowly reopen the water supply. Turn the faucet on and off, then check around the handle for leaks.
If the handle still leaks, the problem may involve another seal, the cartridge, or a damaged faucet body. Further inspection may be needed.
How to Fix a Leaky Faucet with Two Handles (Compression Type)
A traditional two-handle compression faucet often leaks because the rubber washer inside one of its valves has worn out. A damaged valve seat can also prevent the washer from sealing properly.
If water drips from the spout after the faucet is turned off, follow these steps.
Step 1: Identify the Leaking Side
Turn off the water and identify whether the hot or cold side is responsible. If you are unsure, close the two supply valves and test each side carefully after restoring the supply as appropriate.
Do not dismantle a faucet while the water is still running through it.
Step 2: Remove the Handle
Remove the decorative cap, loosen the handle screw, and lift off the handle. Keep the small parts together in a bowl.
Step 3: Remove the Valve Stem
Use an adjustable wrench to loosen the retaining nut or valve assembly, depending on the faucet design. Remove the valve stem carefully.
If the part is badly corroded or will not move, avoid applying excessive force. An older valve can break or damage the pipe connection.
Step 4: Inspect the Washer and Valve Seat
Look at the rubber washer near the end of the valve stem. If it is cracked, hardened, or worn, replace it with a compatible part.
Inspect the valve seat, which is the surface against which the washer closes. If the seat is damaged or badly worn, replacing the washer alone may not stop the leak.
Step 5: Reassemble the Faucet
Install the new washer and reassemble the valve in the correct order. Tighten the parts securely without forcing them.
Restore the water supply slowly and test the faucet. If the drip continues, the valve seat or another component may need repair.
Tip: Replace only the parts that are damaged, but make sure the new washer matches the original in size and shape.
How to Fix a Single Handle Faucet
Single-handle faucets may use a ball mechanism or a cartridge. Before buying replacement parts, identify which design your faucet uses.
The general repair process is similar, but the internal parts and removal method differ.
Step 1: Shut Off the Water
Close both hot and cold supply valves beneath the sink. Open the faucet to release pressure and confirm that the water supply has stopped.
Step 2: Remove the Handle
Locate the handle screw, which may be hidden beneath a decorative cap or positioned at the back of the handle.
Use the correct screwdriver or Allen key to loosen the screw. Lift off the handle without twisting or forcing it.
Step 3: Identify the Internal Mechanism
For a cartridge faucet, you may see a retaining clip or nut holding the cartridge in place. For a ball-type faucet, the assembly may include a cap, rotating ball, rubber seals, and springs.
Take a photo before removing these components. Small parts can be easy to misplace or install incorrectly.
Step 4: Replace the Worn Component
For a cartridge faucet, remove the retaining clip or nut as instructed by the manufacturer. Pull the cartridge straight out where the design allows, and install a compatible replacement in the correct orientation.
For a ball-type faucet, inspect the seals and springs and replace damaged parts using a suitable repair kit.
Do not assume that every single-handle faucet uses the same cartridge or repair kit.
Step 5: Reassemble and Test
Reinstall the components, secure the handle, and slowly turn the water supply back on.
Move the handle through its normal range and check the faucet spout and handle area for leaks. If the leak remains, double-check the cartridge orientation and seals, or seek professional help.
How to Fix a Leaky Bathtub Faucet
A leaking bathtub faucet can waste water and leave mineral stains around the tub. The repair depends on whether water drips from the spout, leaks around a handle, or comes from the shower area.
If water continues dripping from the tub spout after the handles are turned off, the valve inside the wall may have a worn washer, cartridge, or other damaged component.
Step 1: Shut Off the Water
Look for accessible shut-off valves for the bathtub. If there are none, you may need to close the home’s main water valve.
Bathtub valves can be difficult to access, especially when the plumbing is behind a tiled wall. Make sure the water is off before removing any parts.
Step 2: Remove the Handle
Remove the handle cap if present and loosen the handle screw. Carefully lift the handle away from the valve stem or cartridge.
Avoid pulling hard on parts that are stuck because of mineral buildup or corrosion.
Step 3: Inspect the Valve
Depending on the faucet model, you may need to remove a retaining nut, clip, or valve stem. Inspect the washer, cartridge, and seals for signs of wear.
If the faucet has a replaceable cartridge, use the correct replacement part for that model. Some bathtub valves require special tools or careful removal to avoid damaging the plumbing inside the wall.
Step 4: Reassemble and Test
Install the replacement part according to the manufacturer’s instructions. Reattach the handle and restore the water supply slowly.
Run the faucet and check whether the dripping has stopped. Also inspect the handle area and any accessible connections for leaks.
If water is leaking from behind the wall, the valve is badly corroded, or you cannot access the shut-off safely, call a plumber. Hidden leaks can damage wall materials and create costly repairs.
How to Fix a Leaky Bathroom Faucet
Bathroom faucets can leak from the spout, around the handle, or beneath the sink. The source of the leak determines the best repair.
If Water Drips From the Spout
A worn washer, cartridge, or internal seal may be preventing the faucet from closing completely.
- Shut off the hot and cold water supplies.
- Remove the handle and inspect the valve mechanism.
- Replace the worn washer or cartridge with a compatible part.
- Reassemble the faucet and slowly restore the water supply.
- Test the faucet to confirm that the dripping has stopped.
If Water Leaks Around the Base
Water around the faucet base may come from a damaged seal, a loose connection, or water splashing onto the counter. Dry the area completely, then run the faucet and watch where the water first appears.
If water leaks from the faucet body or a seal beneath it, the faucet may need to be removed and inspected. Follow the manufacturer’s instructions or contact a plumber if the connections are difficult to reach.
If Water Leaks Under the Sink
Check the visible supply hoses, shut-off valves, and drain connections. Dry the area first so you can identify where new water appears.
If a supply connection is leaking, turn off the water supply and arrange for the damaged hose, valve, or fitting to be repaired. Do not overtighten connections, as this can damage the fitting or seal.
Remember that a leak under the sink may come from the drain rather than the faucet’s water supply. Identify the source before replacing parts.
When to Call a Professional
Many faucet repairs are manageable for beginners, but some problems require professional plumbing help.
Contact a plumber if:
- The shut-off valve is stuck, damaged, or leaking.
- Water continues leaking after you replace the correct washer or cartridge.
- The faucet body or valve is badly corroded.
- A bathtub or shower valve is difficult to access.
- Water appears inside a wall, ceiling, or cabinet and the source is unclear.
- A pipe connection is damaged or leaking heavily.
- You are unsure how to turn off the water safely.
If a major leak develops, shut off the water supply if you can do so safely. If water is near electrical outlets or equipment, keep away from the affected area and seek appropriate professional assistance.
A plumber can identify the source of the leak, recommend suitable replacement parts, and help prevent further water damage.
Frequently Asked Questions
1. Why Does My Faucet Keep Dripping After I Turn It Off?
A faucet may continue dripping because a washer, cartridge, or internal seal is worn or damaged. Mineral deposits or a damaged valve seat can also prevent the faucet from closing properly. Identify your faucet type before replacing any parts.
2. Can I Fix a Leaky Faucet Without Replacing the Whole Faucet?
Yes. Many leaks can be fixed by replacing a worn washer, O-ring, cartridge, or other small component. However, a badly corroded faucet body or damaged valve may need more extensive repair or replacement.
3. How Much Water Can a Leaky Faucet Waste?
The amount depends on the size of the leak and how quickly the water drips. A slow drip may seem insignificant, but continuous dripping can waste a noticeable amount of water over days or weeks. Repairing the leak promptly can help reduce unnecessary water use.
4. How Much Does It Cost to Fix a Leaky Faucet?
The cost depends on the faucet type, the replacement parts required, and local plumbing rates. A simple washer replacement may be inexpensive, while a cartridge replacement or difficult bathtub valve repair can cost more. Get an estimate before approving professional work.
Final Thoughts
A leaky faucet is a small problem that is worth fixing before it wastes more water or damages the surrounding area. In many cases, a worn washer, damaged O-ring, or faulty cartridge is responsible.
Start by identifying where the water is leaking and what type of faucet you have. Turn off the water supply before removing any parts, keep small components organized, and use replacement parts that match the faucet model.
After the repair, restore the water slowly and check carefully for leaks around the handle, spout, and connections.
If the faucet remains leaky, a valve is badly corroded, or the repair involves hidden plumbing, contact a qualified plumber. A careful repair can help your faucet work properly again and keep your home in better condition.
If the water is leaking into the cabinet below, make sure to read our guide on how to fix a clogged bathroom sink.